Thursday, June 11, 2020

Parmesan Broth with White Beans and Swiss Chard


You may not be thinking about soup at this time of year, but I find that this relatively light soup makes a wonderful first course for a meal of grilled steak or seafood pasta. It is hardy enough to make a meal of in the winter months as well, but when I use it as a first course I serve a small portion in a shallow soup bowl and it works great. Swiss chard is plentiful this time of year and this is a way to use it. I originally found this recipe in a newspaper many years ago, but have altered it a little to suit my taste. The recipe was conceived by Sara Jenkins of Porsena and Porchetta in New York. 

Ingredients: (serves 8-10)

12 Cups Chicken Stock
12 Ounces Parmesan Rinds (available at Whole Foods or most cheese stores)
2 Garlic Cloves - smashed & diced
3 TBSP Olive Oil
1 Dried Red Chili Pepper - crumbled
6 Cups Loosely Packed Swiss Chard Leaves - Stems Removed and Cut into Thin Ribbons
3 Cups Canned Cannellini Beans - Drained
1-2 tsp Lemon Zest
Salt and Pepper to taste
Toasted Baguette Slices
Olive Oil to Drizzle

Preparation:

Over low heat, steep the parmesan rinds in the chicken stock for about 45 minutes, until the rinds are very soft and starting to fall apart. Strain the liquid and reserve. In a heavy bottomed soup pot saute the garlic in the olive oil until it is translucent. Add the crumbled red chili and the Swiss Chard leaves. Using a tongs, stir to coat the leaves in the oil and garlic mixture. Add the warm stock and the cannellini beans and bring to a simmer. Season to taste with salt and pepper and add the lemon zest. To serve, place a slice of toasted baguette into a soup bowl. Ladle the soup over the baguette and drizzle with a little olive oil. 


Sunday, May 31, 2020

Rolled Crepes with Scrambled Eggs, Sauteed Onion and Mornay Sauce


I recently finished reading Dearie, a biography of Julia Child, by Bob Spitz. I had previously read My Life in France, an autobiography by Julia Child,  but it really only dealt with the years that Julia and her husband Paul spent in France. Dearie covers Julia from cradle to grave and really details the struggles she went through to become a very famous cook and then to write and publish her cookbooks and become a TV icon. At any rate, it inspired me to do a little more French cooking, using some of the recipes in Mastering The Art of French Cooking, by Child, Bertholle and Beck as a starting point.  To create the dish above I started by making the basic Crepe recipe from that famous cookbook. When I had the crepes done and held, I made a basic Bechamel(white sauce)  and added cheese, which makes it a Mornay Sauce. While that sauce was holding on the stove top, I sauted  2 Tablespoons of diced onions and then added five eggs beaten with milk to the same saute pan and scrambled them. To assemble the dish you spoon a quarter of the scrambled eggs onto a crepe, roll it up and lay it on the serving plate with the seam side down. As you can see I did two crepes per serving, and then topped the crepes with the Mornay Sauce and garnished with a little chopped fresh parsley. Here are the recipes for each of the components:

For the Crepes: (From Mastering the Art of French Cooking, by Child, Bertholle and Beck)
Ingredients:

1 Cup Cold Water
1 Cup Cold Milk
4 Eggs
1/2 tsp Salt
11/2 Cups Flour
4 TBSP Melted Butter

Preparation:

Using a nonstick pan that is 6 - 8" at the bottom melt the butter on med. heat. While the butter is melting put the water, milk, eggs, and salt into a blender jar. Add the flour. Add the melted butter and blend on high speed for one minute. Scrape down the sides of the blender jar with a rubber scraper and then blend again for a few seconds. Cover and refrigerate for at least two hours. 

The batter should be a very light cream, just thick enough to coat a wooden spoon. If after making your first crepe, it seems too heavy, beat in a bit of water a spoonful at a time. A cooked crepe should be about 1/16 inch thick. 

To make the crepes, I use a little different method than explained in the referenced cookbook. Place the same nonstick pan that you used to melt the butter on a med-high flame. Add a couple more tablespoons of butter to the pan and let it melt. Pour the melted butter into a small dish. You will use this melted butter to brush your pan with between each crepe. Brush your pan lightly with the melted butter and place on the med high burner. When the pan just begins to smoke lift the nonstick skillet off of the heat in your left hand. Using a measuring cup ladle about 1/4 to 1/3 cup of batter onto the left top side of the pan and swirl the pan to create a thin layer of batter covering the bottom of the pan. The amount of batter will depend on the size of pan you are using. Return the pan to the heat and let cook for 60-80 seconds. Using a spatula of fork, lift the edge of the crepe to check for color. You want the bottom of the crepe to be a nice golden color. When you think the crepe is done on the bottom grasp the edge of the crepe closest to you and quickly flip it over toward the rear of the pan. Alternately you can flip the crepe using the pan, but this takes a little practice. Cook the second side of the crepe for about 30 seconds, or just until it begins to brown. This will be the inside of your crepe. Remove the crepe from the pan by flipping it brown side down onto a rack to cool. Then you can stack the crepes one on another to hold. They will also hold nicely in a warm oven. 

For the Mornay Sauce:
Ingredients:

3 TBSP Butter
3 TBSP Flour
11/2 to 2 Cups Milk
1/2 Cup Grated Cheddar or Gruyere Cheese
Salt 
White Pepper
Dried Thyme

Preparation:

In a small heavy bottomed saucepan, melt the butter over low heat. Add the flour and whisk into the melted butter, until you have a smooth bubbly paste. Cook for a couple minutes to eliminate the raw flour taste. The butter/flour mixture is called a roux and is used in many sauces as a thickener. Off the heat, begin adding milk about a half cup at a time while constantly whisking. Add 11/2 cups milk total and return to medium high heat. Continue whisking until sauce thickens. If sauce is too thick whisk in a little more milk. If too thin, continue cooking until sauce reduces and thickens. Once you have the sauce at the consistency you want, reduce heat to lo. Add Grated cheese and whisk in to melt the cheese and blend into the sauce.  Flavor sauce to taste with salt, white pepper and dried thyme. Hold sauce on low heat. 

For the Eggs:
Ingredients:

1 TBSP Butter
2 TBSP Finely Diced Onion
5 Large Eggs
2 TBSP Milk
Salt and Pepper to taste
Chopped Fresh Parsley

Preparation:

Melt butter over medium heat in a nonstick skillet. Add onion and Saute until translucent. While onion is cooking, crack eggs into a small bowl and add the milk. Whisk together until fully blended. Add eggs to the sauted onions and cook. When eggs start to solidify, begin stirring and turning with a spatula. When eggs are almost done, turn off heat. The eggs will continue to cook in the warm pan. Season to taste with the salt and pepper. Assemble the dish on plates as described above. Serve with fresh fruit or a mixed green salad and crusty bread. 


Saturday, May 23, 2020

Classic Eggs Benedict


Is there a better way to start a Saturday morning than with Eggs Benedict ? I don't think so, so here is the recipe. It is really a very simple dish to make once you master the hollandaise sauce. 

Ingredients: (Serves Two)

For the Hollandaise:

10 TBSP Butter
3 Large Egg Yolks
1.5 TBSP Cold Water
1-2 tsps Fresh Lemon Juice
Salt 
White Pepper
Dash of Hot Sauce

For the Rest of the Dish:

2 English Muffins
4 Slices Canadian Bacon
4 Large Eggs
Vinegar
Chopped Fresh Parsley

Preparation:

Step one is to make the Hollandaise sauce. It will hold well while you prepare the rest of the dish. Slice the butter into small portions and melt over med-low heat in a sauce pan. Skim the foam off the top of the melted butter and keep warm. Add about an inch of water to the bottom of a double boiler and bring to a very low simmer. Off of the heat, place the egg yolks and water in the top of the double boiler or in a large stainless steel mixing bowl. I prefer the mixing bowl to the double boiler as it keeps the egg and water mixture further above the heated water and is less likely to curdle the eggs. (See Photo below.)


Whisk the eggs and water together until they are light and quite foamy. Place the bowl over, not in, barely simmering water and continue to whisk until the eggs are beginning to thicken, about three to five minutes. Do not let the eggs get too hot or they will begin to scramble. You can control the heat by lifting the bowl off of the pan a little. Once the eggs have thickened, remove the bowl from the heat and continue to whisk until the mixture has cooled slightly. Whisking constantly, add the warm butter very slowly to the egg mixture. When all of the butter is incorporated into the mixture you should have a wonderfully smooth thick sauce that is a nice yellow color. Now whisk in the lemon juice and salt and pepper to taste. Add a dash of hot sauce and whisk again. If at any time your sauce looks as if it is about to seperate, whisk in a few drops of cold cream. If the sauce does seperate, whisk another egg yolk in a separate bowl and then whisk that egg yolk into the sauce to reform the emulsion. That is all there is to it. To hold the sauce turn the heat off under the steaming water and set the bowl containing the sauce back on top of the pan.

Fill a soup pot with five to six inches of water. Add a couple of tablespoons of vinegar to the water and bring to a boil. Reduce heat to a simmer. 

Place the Canadian Bacon in a nonstick skillet and heat on medium heat. Split the English muffins and toast. Butter when toasted. Lay the English Muffins on a plate and top with the Canadian Bacon

Crack an egg into a saucer and gently slide the egg into the simmering water. Repeat the process until you have all four eggs in the water. The pot needs to be large enough so that the eggs don't touch one another. It will take about five minutes to poach the eggs. Use a large slotted spoon to move any egg white that leaves an egg back to the egg. When the eggs are done use the slotted spoon to remove them one at a time from the water. Hold each egg in the spoon long enough to let any water drain from the egg and then place each egg on top of a muffin that has been topped with the Bacon. 

Spoon Hollandaise over each egg and top with a little chopped parsley. Serve with fresh fruit or a mixed green salad with a vinaigrette. You can also vary this recipe by substituting lox or sausage for the Canadian Bacon. Use your imagination and enjoy !!

Monday, May 4, 2020

From Scratch Lasagna


Completed lasagnas ready to cook or freeze


Since most of us are still confined to our homes, here is a project that will take up about half a day and you will end up with a couple of large pans of lasagna in your freezer, for when you can have friends and family over again. We will start by making a thick meat sauce. Then prepare the ricotta mixture and boil the lasagna noodles. Once all of these components are ready I will walk you through how to assemble the lasagna. If you are going to use one of the lasagnas immediately, start by preheating your oven to 350 degrees. If you want to freeze both pans you can skip that step. You will need two large lasagna pans. I use 9x12" aluminum lasagna pans. They need to be at least 2.5" deep. 

Sauce Ingredients:

2.5 Lbs. loose Italian sausage (you can mix italian sausage with                      ground beef if you prefer) 
2 tsp. Fennel Seed
2 TBSP Extra Virgin Olive Oil
1 Med. Onion - finely diced
12 - 14 Garlic Cloves - minced
4  28Oz. Cans Crushed Italian Tomatoes
2  28 Oz. Cans Diced Tomatoes
2 TBSP +or - Italian Seasoning 
1 tsp. Salt
1/2 tsp. Black Pepper
Red Pepper Flakes - to taste

Sauce Preparation:

Using a large skillet, brown the Italian Sausage. Add the Fennel seed to the sausage as it is browning. I add the fennel as I like a very savory sauce. Feel free to leave the fennel out if you like your sauce a little less savory. You don't need to cook the sausage all the way through as it will cook more in the sauce and when you bake the lasagna. Add the olive oil to a large heavy bottomed soup pot over medium-low heat. Add the onion and sweat until the onion is translucent. Add the garlic and continue to cook for a minute or so, until the garlic has softened and is fragrant, but not brown. Add all of  the canned tomatoes, increasing the heat to medium. When the sauce begins to simmer and is hot all the way through, begin to add seasoning. Add about half of the Italian seasoning, half of the salt and pepper and a few red pepper flakes. Stir in and taste. Remember it is easier to add seasoning than it is to take it out. Keep adding seasoning as desired. You may use more or less than I have spelled out in the recipe. The important thing is the sauce tastes right to you. Once you like the seasoning in the sauce, using a slotted spoon, add the browned sausage and stir it into the sauce. Let the sauce simmer on low heat while you go on to the next steps. The result should be a very thick sauce, which is what you want for lasagna. Your sauce should look something like this:


Ricotta Mixture Ingredients:

2 -15Oz. containers Ricotta Cheese
1/2 Cup Grated Parmesan Cheese
2 TBSP Chopped Fresh Oregano
2 TBSP Chopped Fresh Parsley

Preparation:

Mix the parmesan cheese and the oregano and parsley into the ricotta. Beat until you have a smooth blend and the herbs are evenly spread through the mixture. Set aside.

Noodle Ingredients:

Large Pot of Water
1 TBSP salt
Roll of wax paper. 
24 Lasagna Noodles


Preparation:

Spread wax paper on your countertop, or better yet, in some jelly roll pans. You will need enough space to lay out 12 cooked noodles at a time. Add salt to the water. Bring to a boil over high heat. Add 12 noodles to the boiling water and cook per the package directions. Use a tongs to keep separating the noodles as they cook, so that they don't stick together. When noodles are al dente remove from the water one at a time with the tongs and lay out flat on the wax paper. In the picture below, you can see the cooked noodles laid out on the wax paper. If this looks like too much of a mess for you, you can use the noodles that don't require boiling. I don't like them for several reasons: the texture is different, you can't cut them to size, they are smaller, etc. etc. but I will leave that up to you. 


Now we are ready to begin assembling our first pan of lasagna. In the photo above you will see that I have set up an assembly line. You will need the following. 

Ingredients:

Lasagna Pan
Sauce from above recipe
Ricotta mixture from above recipe
Cooked Noodles
2.5 Cups Mozzarella Cheese for each pan of Lasagna
1/3 Cup Grated Parmesan for each pan of Lasagna

Preparation:

Using a rubber spatula, spread half of the ricotta mixture on the 12 cooked noodles while they are still laying on the waxed paper. I have learned that this is much easier and quicker that trying to spread the mixture on the noodles after you have laid them in the pan. Here is what my noodles looked like once they were spread with the ricotta mixture. 


Ladle about 2.5 Cups of Sauce into the bottom of one of the pans. The bottom of the pan should be covered but the sauce should not be too deep. Top the sauce with four of the noodles that have the ricotta mixture on them. Trim the noodles with a kitchen shears if they are too long for the pan. Sprinkle about 1/3 of the Mozzarella Cheese on the noodles. Now add another layer of sauce, then the next four noodles with Ricotta and another third of the Mozzarella. Repeat again with a third layer of sauce, noodles, ricotta and Mozzarella. Spread the 1/3 Cup Parmesan evenly over the top. Set the assembled lasagna aside. Now prepare the second batch of noodles as above and repeat the same assembly process for the second lasagna. If you are going to freeze either of the lasagnas allow it to cool. Once the lasagna has reached room temp you can cover it with Saran and foil and Freeze. If you are going to use the lasagna immediately, cover with foil and put in the 350 degree oven sitting on a cookie sheet. Cook for about forty minutes covered and then remove the foil and cook for another fifteen minutes or until it is hot and bubbly. Let stand for a few minutes before serving. This will allow the lasagna to set up and you will be able to cut nice portions that hold together. Serve with a green salad, crusty bread and a nice Italian red wine.  Enjoy!!!

Saturday, April 11, 2020

Fresh Lobster


Last night our friends the Halls called and said they had gotten four live Maine lobsters, but didn't know how to cook them. Would I cook them if they gave us two?  Of course I said, but honestly I had never cooked live whole lobsters before. I usually just buy the tails and grill them, but I thought I would give it the old college try. In normal times we would have had them over for drinks and dinner, but of course we are social distancing, so the plan was for me to cook and prepare a carry-out dinner for them and a sit down for us. 

Step one when I am going to do something I haven't done before is to open up the Joy of Cooking. This wonderful book precedes every section of recipes with an "About" section. For example "About Lobsters", which described different types of lobsters, where they come from, size needed per person, how to store them, and how to handle and prepare them for cooking. Then the book moves on to describe several methods of cooking the lobster, including steaming, boiling, grilling or broiling. Next came a number of recipes for using the meat of the lobster. For example, lobster thermidor and lobster newburg, etc. etc.

I went with steaming the lobster. It is the simplest way to cook a whole lobster, and the lobster does not contain the excess moisture that you get if you boil it. Broiling or grilling are options as well, but I went with the simplest approach. 

An hour before dinner I put four potatoes in a 400 degree oven to bake. Fifteen minutes prior to dinner I drizzled some asparagus spears with extra virgin olive oil and put them into the same 400 degree oven. Steaming the lobster goes like this:

Ingredients: 

4 - 11/2 to 21/2 pound lobsters
2 sticks melted butter
lemon wedges for serving

Preparation:

Put about an inch and a half of water in a large deep soup or pasta pot. If you have a steamer basket(see photo above) set it in the top of the pot, or use a rack that will hold the lobster above the water. Bring the water to a furious boil. Reduce the heat and add the lobsters to the steamer basket. Cover and weigh down the lid of the pot to hold in the steam and the lobsters. For pound and a half lobsters, steam about 12 minutes. Add an additional two minutes for every half pound of weight. Serve with lemon wedges and melted butter. This may be just about the simplest dinner you can 
make. Most of the fun is in the eating. Enjoy! 


Saturday, March 21, 2020

Quick and Simple Cream of Mushroom Soup

Well, pretty much like everyone else, we have been stuck in our house for the last couple of weeks. Our only trips out have been to go to the grocery store. We have had some beautiful days weather wise and I at least get out to walk the dog on those days. On the rainy or cold days I fall back to cooking. A couple of days ago it was cold and rainy and so I was looking in the refrigerator to see what we had that needed to be used. We had a large container of Cremini (baby bella) mushrooms so I decided that it was a good day for soup.  I have previously posted a recipe for cream of mushroom soup, but this one is simpler,quicker and requires less ingredients. It is quite thick and creamy and tastes great so give it a try with some good crusty bread. 

Ingredients:

1.5 Lbs baby bella mushrooms
2 Leeks, white part only, finely chopped
6 TBSP butter
4 TBSP flour
3/4 tsps salt
1.5 Cups Heavy Cream
1.5 (14.5 OZ) cans chicken broth
1.5 TBSP Dry Sherry
Freshly Ground Black Pepper
Chopped fresh parsley

Preparation:

Slice enough mushrooms to make about a cup and a half. Finely chop the rest of the mushrooms. Melt butter in a 4 Qt. sauce pan or heavy bottomed soup pot over medium heat. Saute the chopped leeks until tender and translucent. Add the chopped and sliced mushrooms to the pot and cook until the mushrooms are tender and have given up most of their liquid (about ten minutes). Sprinkle the flour and salt over the mushrooms and stir continuously until thickened and flour is absorbed into the mixture. Gradually stir in heavy cream and broth. Heat until hot. Stir in Sherry and season to taste with the pepper. Top with a little chopped parsley and serve. Alternatively, top each serving with a dollop of creme fraiche or sour cream and a little dusting of paprika. Enjoy, but be careful. This is not a low calorie soup.

Monday, March 2, 2020

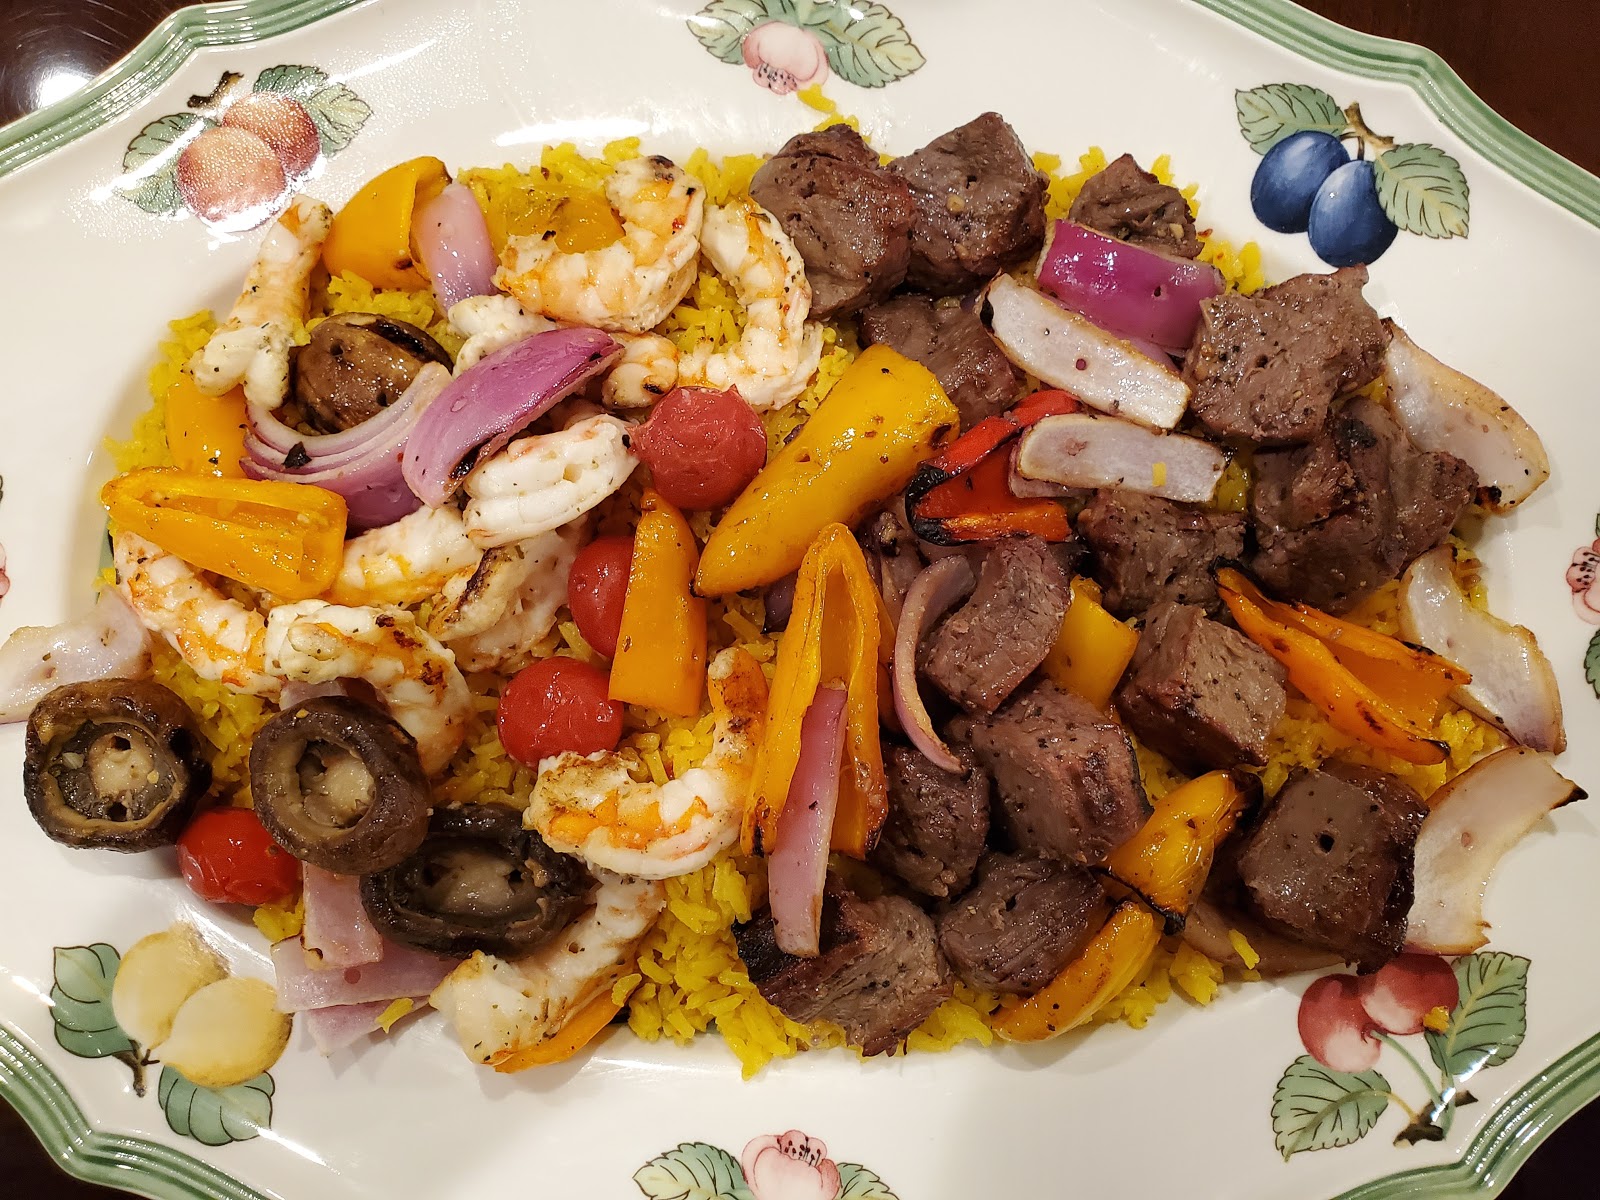
Shrimp and Steak Kabobs

Steak and Shrimp Kabobs

We had some beautiful weather here in KC over the weekend and it put me in the mood for grilling. Here are a couple of easy recipes that I made for dinner Friday night and served over a bed of Vigo Yellow Rice, which is available in any grocery store. Making both recipes at the same time will easily feed four people and served with the rice makes for a pretty healthy and flavorful meal.

Shrimp Kabobs

Ingredients:

1 Cup Italian Dressing, divided (I like Ken's)
1 Pound Uncooked Shrimp(21-25 Count)-peeled and deveined
1 Onion. cut into wedges
8 Large Baby Bella Mushroom Caps
5-6 Assorted Mini Peppers, halved and seeded
8 Cherry Tomatoes

Preparation:

Combine shrimp and half of the salad dressing in a gallon Ziplock bag. In another Ziplock, combine the vegetables and the remaining half of the salad dressing. Refrigerate for 2 hours, turning occasionally. Soak bamboo skewers in water. 

Drain and discard marinade. Alternately thread shrimp and vegetables onto soaked bamboo skewers. I like to use two parallel skewers for shrimp to keep them from spinning when you turn them on the grill. Grill over medium heat for about 3-4 minutes per side until shrimp turn pink. Do not overcook. 

Steak Kabobs

Ingredients:

1/2 Cup Extra Virgin Olive Oil
1/2 Cup Lower Salt Soy Sauce
2 tsp minced garlic
1 tsp Coarse Ground Black Pepper
1 Pound Filet Mignon-cut into 1" squares(substitute sirloin if                desired)
5-6 Assorted Mini Peppers- halved and seeded
1 Red Onion-cut into wedges
8 Large mushroom caps

Preparation:

In a medium bowl, combine olive oil, soy sauce, garlic and peppers. Stir well and pour into a Ziplock Bag. Add the steak to the bag, toss and seal. Refrigerate for up to two hours, turning occasionally. Soak bamboo skewers. 

Once the meat has marinated, thread it onto the skewers, alternating it with peppers, mushrooms and onion wedges. Grill over medium heat, turning frequently, until all sides of the meat are nicely browned and the vegetables are tender. (about 10 to 12 minutes)