For the first eight years that we were retired we lived on an island near Hilton Head in South Carolina. It was a golf community and had a great Chef at the clubhouse. My wife took a cooking class there and this recipe is a reminder of our time at Callawassie. It is a chilled summer soup and makes a great first course for dinner.
Ingredients:(Serves 8-10)
3 Cups Chopped Tomato (Peeled &Seeded)
2 Cups Tomato Sauce
3 Cups Tomato Juice
1/2 Cup Red Wine Vinegar
1/2 Cup Sugar
1/2 Cup Olive Oil
1 tsps. Pepper
3 TBSP. Chopped Garlic
2 TBSP. Oregano
2 tsps. Salt
2 tsps. Worcestershire Sauce
1/4 Cup each of Diced Carrots, Diced Celery, Diced Cucumbers, and Diced Green Pepper
Preparation:
Combine first 11 ingredients (everything except the diced vegetables) in a large non-reactive bowl. Chill in the fridge for at least an hour. Check Seasoning and adjust to your taste. Before serving pour into a blender and add the diced vegetables. Blend, but not too smooth. Serve and enjoy.
Tuesday, May 31, 2016
Tossed Greens and Grapes Salad
Want something a little different when it comes to salad ? Here is a recipe from an old Southern Living magazine, that is different, fresh and springy tasting and has some ingredients that are unique. It only takes about 15 minutes to make and I think you will like it.
Ingredients:
3/4 Cup Extra Virgin Olive Oil
1/4 Cup Red Wine Vinegar
11/2 tsps. Dijon Mustard
11/2 tsps. Honey
1/8 tsps. Salt
1/8 tsps. Pepper
1 (5OZ.) Package Spring Greens
2 Cups Red Seedless Grapes, Halved
1 Cup Salted, Roasted Cashews
2 Oz. Manchego Cheese, shaved
Preparation:
Stir together first six ingredients in a large salad serving bowl, to make the dressing. Add the spring greens and the next three ingredients and toss thoroughly. Serve.
How easy is that ? And very tasty !
Saturday, May 28, 2016
Who wants plain old burgers ?
OK, OK, so you just want some burgers for your Memorial Day picnic. Burgers are great, but they don't have to be boring. Kick your burgers up a notch with one of these recipes.
When I was a kid I had an uncle who was quite successful. He was also into grilling before it was all the rage. He was the first person I ever knew who had a Weber Kettle. Charcoal of course, in those days. No such thing as a gas grill then. My uncle gave us a Weber one year and when he came to town, he would go to the local grocery and buy 1 1/2" thick porterhouses for the grill or he would make great thick and juicy hamburgers. For most kids my age, Mickey Mantle or Stan Musial were their hero's. I wanted to grow up like my Uncle and be able to go to the store and buy those big porterhouses or make those hamburgers. Here is my rendition of Uncle Roland's burgers.
Ingredients: (Makes 6-8 burgers)
Burgers:
2 Lbs. ground round - I like the 85% lean for burgers
1/2 of a large sweet onion diced
10-12 Baby Bella mushrooms cut into 1/8 inch dice
2 eggs
1/4 cup oatmeal
Salt and pepper
Toppings:
2 large sweet onions - sliced thinly
4 TBSP Butter - Divided
2 TBSP Olive Oil
8 Oz. Baby Bella mushrooms - stems removed and sliced
Red pepper flakes
Salt
8 slices Swiss cheese
8 Slices Bacon - cooked crisp and cut in two.
Preparation:
In a large bowl mix all burger ingredients with your hands, until the egg is thoroughly spread into the meat. The egg and oatmeal will hold your burgers together better on the grill. Form into patties. I like to make about three patties per pound but you can do four if you like the burgers thinner. Hold the burgers in the fridge. Preheat your grill on high heat.
In the meantime, melt 2 TBSP of the butter and one TBSP of the olive oil in a large skillet. (cast iron works great for this) Add the sliced onions. Season with salt, pepper and the red pepper flakes to taste. Sauté onions until straw colored and tender. They should be nice and caramelized. In another skillet melt remaining butter with the remaining oil, and sauté the sliced mushrooms. Season with salt and pepper.
Sear burgers on both sides on the hot grill. Reduce heat and grill to desired level of doneness. Just before taking off of the grill add the Swiss cheese to each burger, and leave on the grill until the cheese starts to melt. Serve hot, with the caramelized onions, sautéed mushrooms and bacon slices offered as additional toppings. The mushrooms and onions cooked in the burgers give them a great flavor and keep the meat moist.
Here is a second recipe that came from a Southern Living magazine years ago. It is another take on a burger that is interesting and different.
Ingredients:
1/4 cup soy sauce
2 TBSP corn syrup
1 TBSP lemon juice
1/2 tsp. ground ginger
1/4 tsp. garlic powder
2 green onions - thinly sliced
2 LBS. Ground Beef
1/4 cup chili sauce
1/4 cup jalapeno jelly
8 hamburger buns
Toppings: grilled sweet onion slices and grilled pineapple slices
Preparation:
Stir together first six ingredients; pour into a shallow baking dish.
Shape beef into patties; place into the marinade in a single layer, turning to coat both sides. Cover and marinate four hours in the fridge. Drain reserving marinade. Grill patties over medium high heat for about 5 minutes per side or until they are at your desired degree of doneness, brushing several times with the marinade. Grill onion slices and pineapple slices along with the burgers. Stir together chili sauce and jalapeno jelly. Serve burgers on buns with chili sauce mixture and other toppings.
Hope you have a great Memorial Day, and don't forget to pause and reflect on those who have paid the ultimate sacrifice for our nation.
Friday, May 27, 2016
Salmon Grilled on a Cedar Plank
Here is another recipe for your memorial day picnic. There are lots of varieties of this sort of recipe. I got this one from Spaces Magazine, a Kansas City publication. The article was about Cody Hogan, who at that time anyway, was the Chef De' Cuisine at Lidia's Kansas City. Lidia's is owned and operated by Lidia Bastianich, the famous Italian chef. The point of the article was how Cody came up with easy but delicious meals for weekends off. Since he spends his days in a kitchen, he was looking for simple ways to make something special for the weekend. This salmon is easy to make, tastes delicious, and makes a great presentation.
Ingredients:
(serves 8, for fewer people just use a smaller piece of salmon and don't use all of the marinade)
One untreated cedar plank - weigh down in water and soak for at least 45 min.
1 side of salmon, about 3 pounds, skin on, bones removed, and scored down to the skin but not through the skin, into serving size pieces. The skin will hold the pieces together while cooking, and keep the salmon moist.
1/3 cup Extra Virgin Olive Oil
3-5 Garlic cloves, peeled and thinly sliced
1/2 lemon, thinly sliced. Reserve the other half, cut into wedges for serving.
Approximately 1/4 cup finely chopped dill or fennel fronds. (I like dill.)
2 tsps. sea salt
Freshly ground black pepper
Preparation:
Soak the cedar plank, as stated above, at least 45 minutes. Longer is better.
Weigh it down in the water with a 28 oz. can or other heavy object.
Combine the olive oil, sliced garlic, and chopped dill and rub into the salmon, making sure to get the seasonings down into the scores separating the side into pieces. Insert thin lemon slices into the scores between each serving. Season with salt and pepper. Allow the salmon to sit and marinate while the grill heats. Turn all burners on a gas grill to high for 10 minutes to allow grill to heat. Turn middle burner off and outside burners to medium heat. Lay plank on grill and close lid. Check in a few minutes to make sure the plank has started to smoke. Once the plank is smoking, lay some more dill fronds on the plank and then transfer the salmon onto the plank, on top of the dill. Cook covered, over the indirect heat for approximately 20-25 minutes, until the salmon is translucent throughout and is beginning to give off it's milk. (You will see white drops appearing on the sides of the meat.) Time may vary depending on the thickness of the salmon. When salmon is done, remove from grill and slide the entire side gently onto a large platter. Cover with foil and let sit for 5 minutes before serving. Garnish with dill and lemon wedges. Serve with a salad, and a crisp white wine such as sauvignon blanc, or if you prefer a nice oaky chardonnay or a Willamette pinot noir.

Wednesday, May 25, 2016
Marinted Green Beans with Tomatoes, Olives and Feta
Well, I'm just back from my golf trip with my high school buddies and it was just as much fun as I thought it would be. I always have a great time with these guys. One of the guys had made a DVD from old game films of our senior year of football. We only lost one game that year and won our Conference, so it was fun to watch and reminisce about those good times.

But on with life and the next good times. With Memorial day coming up this weekend, I thought it might be a good time to post some recipes that you can use for your memorial day picnic. This recipe for marinated green beans came from a magazine years ago. I have saved the recipe and used it over and over as a great side dish that can be made ahead of time and served at room temperature for any meal from a picnic to a sit down dinner.
Ingredients:(8 to 10 servings)
2 pounds fresh green beans - trimmed
11/2 tsp. salt divided
2 garlic cloves - minced
1/4 cup olive oil
1 cup pitted kalamata olives - sliced
2 tomatoes - seeded and chopped
2 TBSP red wine vinegar
1 TBSP fresh oregano - finely chopped
1/4 tsp. pepper
2 (4 oz.) packages crumbled feta cheese
Garnish: fresh oregano sprigs
Preparation:
Place beans in boiling water seasoned with 1 tsp. of the salt; cook 6-8 minutes or until crisp tender. Drain and plunge beans into ice water to stop the cooking process and preserve their bright green color. Drain and let the beans dry on a layer of paper towels. Place beans into a flat serving dish.
Sauté garlic in hot olive oil in a skillet for 30 seconds or until fragrant. Remove skillet from heat and stir in the olives, tomatoes, red wine vinegar, fresh oregano, and the pepper. Pour mixture over green beans, stir to coat and allow them to sit in the fridge for at least three hours or overnight. Remove from fridge one hour prior to serving and allow to get to room temperature. Season with remaining salt. Sprinkle the feta cheese over the green beans and garnish with oregano sprigs. This will make a beautiful presentation and is a tasty side for your picnic. It goes great with hamburgers.
Friday, May 20, 2016
Gone Golfing
I am leaving town for a few days, so there won't be any new posts for a while. I am meeting a dozen or so of my high school buddies in Omaha. We will play golf, tell stories, and try to remember what it was like when we were 17. The golf won't be very important but the time with old friends will be priceless. As we get older, we have realized that we probably shouldn't wait for a class reunion every five years to see one another. We are spread all over the country and getting together isn't easy, but we try to do it every couple of years at least. It is a pretty special bunch. We all played sports together, were pretty fair students and have all led productive lives. We were good solid Midwest kids. We have a doctor, teachers, coaches, engineers, salesmen, railroad men, financial guys, accountants, and a law enforcement guy in the group. All but a couple are retired now and we have all gotten to be about 70. We were all baby boomers. Many of our dads were veterans of World War II, as were most of our coaches and teachers. Many of us did our time in Viet Nam. Just a bunch of "grumpy old men", but all good solid citizens and for me a pleasure to spend time with. Talk to you all when I get back.
Horseradish Mashed Potatoes with Caramelized Onions
Here is a way to change up an old standard. These mashed potatoes aren't your Grandma's mashed potatoes. They will get people's attention. If you don't like horseradish, just leave that out and do the caramelized onion topping. I like them either way. This is a recipe that I got from a friend in South Carolina. Where she got it I don't know, so can't really credit anyone beyond my friend.
Ingredients:
1/4 Cup plus 6 TBSP. butter (11/4 sticks)
21/2 LBS. white onions - thinly sliced
3 TBSP. Balsamic Vinegar
2 Tsp. chopped fresh thyme
31/2 Lbs. russet potatoes, peeled and cut into one inch pieces
6-8 TBSP. whole milk or cream
1/4 cup prepared horseradish
Preparation:
Melt 1/4 cup butter in a large skillet over medium heat. Add sliced onions; sauté until deep golden color, about thirty minutes. Add vinegar and thyme. Reduce heat to low and sauté another 4 minutes. Season with salt and pepper.
Meanwhile, cook potatoes in large pot of boiling salted water, until very tender, about twenty minutes. Drain and return to same pot. Mash until smooth. Add 6 TBSP milk, the horseradish and 6 TBSP butter. (I like to heat the butter and milk together in the microwave before adding them to the potatoes). Stir together, or use a hand mixer to blend smoothly. Thin with the two extra TBSP milk if necessary. Season with salt and pepper.
Transfer the potatoes to a baking dish. Spoon onion mixture over the top of the potatoes. (Can be prepared up to 8 hours ahead of time) Cover and refrigerate. Rewarm in 350 degree oven for about thirty minutes before serving. These go great with beef or ham.
Thursday, May 19, 2016
Paella
Paella is a dish that originated in Valencia Spain in the mid 19th century. The original dish was made with meat, typically rabbit and chicken and sometimes snails were added. It also had green beans, white beans,rice and a number of spices. Over time, Spanish costal towns adopted the dish and substituted seafood for the meat. They typically used mussels, shrimp, cuttlefish and sometimes even lobster. This then evolved into what in Spain today is called mixed paella (paella mixta), where there are combinations of meat, seafood and sometimes even sausage. Paella is typically cooked over an open fire, in a large shallow pan. Some modern varieties are cooked on the stove top, but my particular recipe starts on the stovetop and is finished in the oven in a Dutch oven or large roasting dish. I got the original recipe through a gourmet group that we belonged to years ago in Connecticut. I have made a couple of modifications over time, but the recipe is basically the same one that We have been using for over 30 years.
Ingredients:
16 mussels, in well scrubbed shells
1/3 cup dry white wine
2 TBSP minced onion
1/4 cup minced parsley
1 three Lb. chicken cut into pieces ( I generally substitute chicken thighs)
2/3 cup Extra Virgin Olive Oil
1/2 Lb. round garlic-seasoned sausage cut into 1/2 inch slices
1/4 cup chopped onions
2 garlic cloves, minced
1 can artichoke hearts
16 small clams (soaked in at least three clean water baths)
16 Large Shrimp, peeled and deveined
3 large tomatoes, peeled and chopped
1 whole pimento, cut into strips
2 Cups long grain rice
3 Cups hot chicken broth
3 tsps. salt
1/4 tsps. cayenne pepper
1/2 tsps. saffron
2 cups frozen peas
Preparation:
Preheat oven to 325 degrees. In a saucepan, simmer mussels in wine with parsley and minced onion until onion is soft. Remove mussels and set aside. Save broth. In a large Dutch oven on the stovetop sauté chicken in olive oil until golden brown. Remove chicken. Add sausage, the 1/4 Cup onion and the garlic. Sauté until the onion is straw colored and soft. Add half of the clams, shrimp, tomatoes, pimento, rice, chicken broth, mussels, mussel broth, artichoke, peas and chicken. Sprinkle with half the salt, cayenne, and saffron. Now with the other half of the ingredients repeat the procedure, layering another layer on the first set of ingredients. Cover tightly with foil or a tight fitting lid. Cook in the oven until rice is tender (approximately 35-45 minutes). Serve on a hot serving platter with the chicken, seafood, and sausage on top of the rice.
This is a one dish meal. I like to serve with crusty baguette, Rioja wine and maybe a side salad. The meal is capped perfectly with a flan, but more on that later.
Wednesday, May 18, 2016
Quick fix meals can still be visually appealing
I know some of you have read some of my posts and said to yourselves, "does this guy have a life ? Does he do anything but cook ?" I play golf at least three days a week, and serve on a charity Board, as well as a few other activities, like attending a lot of my grandson's games, so yes, I have a life and I don't always prepare a gourmet meal. Today I played golf and got home at 4:00PM. I had a meeting to attend from 5:30 to 6:30, so what do we do on nights like this. Some times we go out, but this morning we remembered to take a couple of Berkshire pork chops out of the freezer. We had some Sweet potatoes and a bag of broccoli slaw mixings on hand. We always keep a jar of Marzetti slaw dressing in the fridge. Before I left for my meeting, we agreed that Jan would put the sweet potatoes in the oven to Bake at about 6:30. She mixed the broccoli slaw mixings with the Marzetti dressing and put it in the Fridge. When I got home at 6:35, I mixed up a quick egg wash (two eggs and a little cream), and dipped the pork chops in that. I then dredged them in Italian bread crumbs and a little salt and pepper. I melted a little butter in my braising pan, that I wrote about yesterday and added a little olive oil. I browned the chops on all sides in the braising pan and then looked in the pantry. I found a jar of Cherry Republic Cherry BBQ sauce. I dumped the jar of BBQ sauce over the chops, put the lid on the braising pan and put them in the 375 degree oven with the sweet potatoes. Twenty-five minutes later we had this plate for dinner.

Nothing too fancy, nothing gourmet, just using items we had on hand. I think the plate is beautiful and the meal was very tasty. Notice the colors though. We always try to have at least three colors on the plate. I also sliced the chops, which makes for a more attractive presentation, and then ladled the sauce over the sliced chops. I find if you slice a chop or a steak and just put some of the chop or steak on the plate, you won't eat as much as you do when you throw the whole chop on the plate. We cut the baked sweet potatoes and cross hatched them with a knife, and dolloped a little sour cream on them. All of these quick tricks made a pretty plain meal into something that looked very attractive.
The whole point is, just because you don't prepare a gourmet meal every night doesn't mean your meals have to look plain or unappetizing. Take care in what you prepare. Try to have a protein, a starch and a vegetable with each dinner, and think about the color and contrast on the plate. Believe me when I say, things taste better when they look good.
Tuesday, May 17, 2016
Pots and Pans
Our cookware has evolved over the years. The very first set of cookware we had was Wear Ever, purchased by my wife to be, from a door to door salesman. It was excellent cookware but wasn't designed to be put in a dishwasher. Dishwashers weren't common in the sixties. As they became more common and we eventually got one, we pretty much wiped out our cookware by putting it in the dishwasher.
Our next set of cookware was Circulon. We purchased a ten piece set about twenty or twenty- five years ago, when Circulon was first coming out. It was relatively high end at the time, but has since been surpassed, in my view, by Calphalon as the brand of choice if you are into non-stick pans. The Circulon did a fine job of cooking, but if you recall, the non stick surface consisted of concentric rings of non-stick coating in the pans with an anodized finish on the exterior. Food tended to get stuck in between the rings and made the pans hard to clean and keep looking nice. The stovetop pans did not have metal handles and were limited to low temperature uses in the oven. I just replaced the last one of those skillets that I was still using.
I got my first All-Clad pan about ten or fifteen years ago, and have become pretty much of an All-Clad devotee ever since. The best selling line of All-Clad is stainless steel. It is triple ply with a layer of aluminum in the core to promote even heating and conduction. The stainless surface of the pans is hard and tough. It cleans easily and is dishwasher safe. You can keep the exteriors looking like new with an occasional cleaning with Bar Keeper's Friend. These pans conduct heat more evenly than any I have ever used. They can be used on any type of cooking surface, including induction. Copper pans are great for even heating but the handles get really hot, and they are a bear to keep looking nice. All-Clad handles are riveted on and they stay relatively cool while being used on the stove top. I never need a mitt. These pans can also go directly into the oven or broiler. Overall, I think the durability, functionality, and flexibility of All-Clad stainless pans beats everything else in the marketplace. All-Clad offers other lines, including Copper Core, Brushed Stainless, D-5, etc. All are more expensive than the basic stainless line, and in my view, the advantage of each of these lines is not offset by the extra cost or the loss of flexibility. For example, the Copper Core line may conduct heat slightly better than the stainless steel line, but not enough to offset the extra cost.
I have built my All-Clad collection a pan at a time. Even the stainless steel line, which is the least expensive All-Clad alternative is expensive. Most pans range somewhere from $100 to $300+. You can save by starting with a ten piece set, but it may not have the range of pans you are looking for. Retail price on that set is around $1300. As I said earlier, I have built my collection of pans over a number of years. I watch for sales and as an example, I just bought a 12" stainless non-stick fry pan with a lid, for $119 at Williams Sonoma. List price was $260. It was a special promotion and had another 20% off of the promotional price. Taking this approach to collecting my pans has taken some time, but I have almost everything I want at this point. I generally have a pan of some nature on my Christmas wish list. This year it will be a three quart sauce pan. (then "I promise I am done") The stainless All-Clad line comes with a lifetime warranty and is made in America.
My favorite pan is my Braising pan. It is in essence a large fry pan, with a domed lid, that is very useful for everything from sautéing to frying to actual braising. I use this pan almost daily either on the stove top or in the oven. It is really great for browning meat on the stove and then transferring the pan directly into the oven to finish cooking.


I have several other skillet type pans including a 12" covered sauté pan, 8" and 12 " fry pans with non stick interiors, and a 12" standard fry pan. The stainless All-Clad non-stick pans are great for omelets, or fish or other delicate foods that you don't want to stick to the pan. I also have 2 and 4 quart sauce pans, with a steamer basket for the 4 quart one. I have a large pasta pot with steamer and strainer inserts. I love all of these pans, but as you can see we haven't invested in a roaster or any of the other baking type pans. We still have a beautiful roasting pan that came with our set of Circulon, and I am not willing to spend close to $400 to replace it with All-Clad. It is a less frequently used pan at our house and not worth the investment.
In addition to my All-Clad, I have a couple of other pans that I use frequently. One is a large Lodge cast iron skillet. This is like the old black skillet your grandmother used to use to fry the Sunday chicken. If you want to caramelize onions or get a great blackened crust on some redfish, there is nothing quite like a Lodge cast iron pan. You can sear a steak in one on the stove top and set it directly into a 500 degree oven to finish off the steak. They come in a multitude of sizes and I think everybody should have at least one. They are made in America and will be heirlooms.
I also have a large (7QT.) Le Creuset Dutch Oven. These pans are made in France. They are cast iron that is coated with enamel. The cast iron distributes heat evenly over the entire surface of the pan and retains heat and moisture. The enamel finish makes them easy to clean. This pan would be the other reason I haven't invested in an All-Clad roaster. For doing short ribs or other cuts of meat that need to cook for a long time with lots of moisture and low temps the Le Creuset Dutch oven is hard to beat. You can even bake bread in it, if you are into that sort of thing. I love to use it to make Paella. The rice, chicken and seafood come out moist and cooked just right. The main downside of this type of pan is that it is extremely heavy. I have the largest size and it takes both hands to lift it. They are also quite expensive. A two quart size retails for about $200 and the largest size $360.


Any good cook will tell you that you need a very small sauce pan in which to make sauces. Often referred to as a saucier these pans are generally about one quart and often don't have lids. I have a nice Calphalon stainless steel one that my wife picked up at T.J. Maxx.
So there you have it. Unintentionally, I have selected specific pans for specific uses. Mostly they are All-Clad, but not all. Some are used almost daily and some infrequently, but each one has a use and that is why I keep them. I don't want to add up what I have spent on pans over the years, but each one has been worth it. Come to think of it,the total may be less than I have spent on golf balls. I lose them and I have never lost a pan.
Monday, May 16, 2016
Eggplant & Italian Sausage Napoleons
Fifteen
years ago or so, my wife and I were having dinner at an Italian restaurant on
Hilton Head. I had a delightful
appetizer that led me to create this recipe.
The restaurant, the name of which I no longer remember, is long gone, as
is my memory of what they called the dish that inspired the recipe. At any rate, I went home that evening
thinking “I know I can make something that recreates the essence of that dish.
“ So the next day, I gathered up the
ingredients and went to work trying to create something that very closely
resembled what I had had the night before.
I think the result is very tasty and can be used in a smaller portion as
an appetizer or in a generous portion as an entrée.
The original
Napoleon is a classic French pastry layered with custard. The French name, mille-feuilles, literally
means thousand leaves, for its delicate multiple layers. Over the years, the term napoleon has come to
be used for most any dish which is stacked into layers. In the case of this recipe, the stacks are
eggplant and Italian sausage, therefore the name Eggplant & Italian Sausage
Napoleons.
Ingredients:
(Serves Four)
½ Onion-
finely chopped
2 Small
Cloves Garlic – crushed in a garlic press
1 – 28 Oz.
Can Crushed Tomatoes
Italian Seasoning
Salt and Pepper
2 TBSP Cream
1 Lb. Sweet
Italian Sausage Links (About 4 sausages)
2 Eggplant –
peeled and sliced into 3/8 “ slices
Extra Virgin
Olive Oil
Salt and
Pepper
Balsamic
Glaze – Can be purchased or made by reducing balsamic vinegar
Fresh Basil
Leaves for Garnish
Preparation:
Sauce:
In a heavy bottomed
sauce pan, add olive oil and sauté the chopped onion until translucent. Add the crushed garlic and continue to sauté,
until the garlic releases its bouquet and is soft. Use care not to burn the garlic. Add the crushed tomatoes and a little Italian Seasoning. Simmer over low heat for at least thirty
minutes. Season with salt and pepper to
taste. Just before using the sauce, stir
in the cream, using enough to change the color of the sauce from red to pink. The cream cuts the acidic taste of the tomato
sauce and makes for a very smooth blend with the eggplant and sausage.
Sausage:
While the
sauce is simmering cook the Italian sausage.
I do them on the grill or on a grill pan over the flame of a gas
cooktop. Once cooked, slice each sausage
lengthways into thin slices. I usually
discard the two outside slices and end up with three slices out of the “filet”
of each sausage. Then cut each slice into two pieces so that each slice is
about the length of the diameter of your eggplant slices. You will need about four to six of these short
slices for each napoleon. You can hold the sliced Italian sausage in a 200
degree oven while you grill the eggplant.
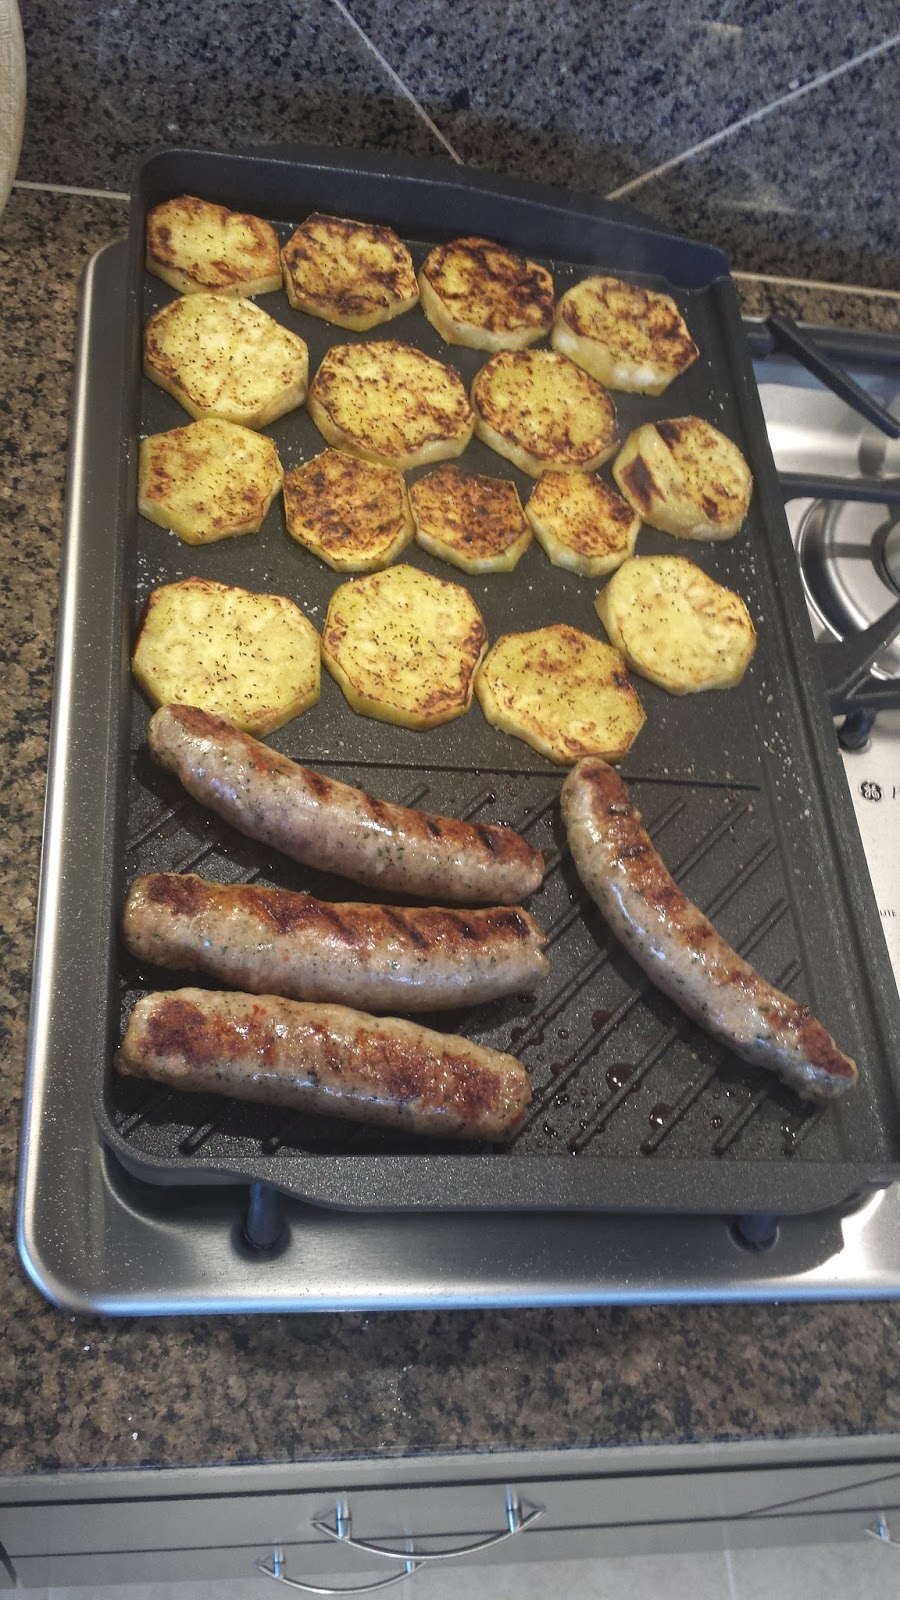 |
| Eggplant and sausage cooking |
 |
| Sliced Sausage |
Eggplant:
Brush each
slice of eggplant with olive oil. Season
each slice with salt and pepper and either grill the eggplant or use a grill
pan on your cooktop. You want the grill
marks on the eggplant. Grill the
eggplant until it is soft and shiny looking, but not until it begins to fall
apart. You will want three to four
slices of eggplant for each napoleon.
Assembly:
In a flat
bowl, put in the first layer of grilled eggplant, top it with two pieces of
sliced sausage, add another layer of eggplant and top again with sausage, add
another layer of eggplant. For an appetizer sized portion this will be enough
eggplant and sausage. For an entrée you
may want to add another layer. Your top
should always be a slice of eggplant. You can hold the stacks in a 200 degree
oven until ready to serve. When ready to
serve ladle a good sized portion of sauce over the stacked eggplant and sausage. Drizzle the top of the Napoleon with about a
teaspoon of Balsamic Glaze and top with a couple of fresh basil leaves as
garnish.

Serve with Crusty bread and nice Chianti. Ciao !! |
| Stacks assembled |

Sunday, May 15, 2016
Food Truck Sunday
Each Sunday in the summer The Roasterie, a Kansas City coffee roaster, that services espresso bars, coffee houses, fine restaurants, high end grocers and coffee lovers everywhere holds a food truck brunch in their parking lot on 27th St. just off of Southwest Boulevard. Their iconic logo, a DC-3 is mounted over their building and looks as if has just taken off from the lot. Of course they have their own truck selling fine coffee. There are also a number of other food trucks selling everything from hamburgers, to BBQ, to Italian fare. There is also a live performer, making the whole experience a fun way to spend a Sunday morning in KC. Food trucks are quite a tradition here and have spawned some of the best restaurants in town, when the chef's popularity exceeds the truck's capacity.

Today I sampled another Kansas City icon. Burnt end BBQ. The famous food writer and humorist Calvin Trillin, who grew up in Kansas City, first sang the praises of "burnt edges of the brisket" in his famous love letter to Kansas City BBQ, which was published in Playboy magazine in 1972. These burned edges were simply chopped off the brisket by the counterman at the famous Arthur Bryant's, and shoved over to the side of the counter in a pile. Anyone that wanted them could take some and pile them on white bread and smother them in sauce, as they were in fact somewhat burned and sometimes dry. Kansas City BBQ restaurants took full advantage of the article and soon almost every restaurant in town was serving what became "Burnt Ends". Originally Burnt Ends were the crisp and charred pieces cut from the fattier corners of the brisket after it was smoked. Most pit masters today produce their Burnt Ends using either part of or the entire brisket. Brisket consists of two muscles separated by a layer of fat. The larger leaner muscle is called the flat. On top of the flat is a smaller fattier muscle called the point. Most restaurants today smoke the entire brisket and then remove the point from the flat. The point is returned to the smoker to char it and then it is chopped into pieces to become the Burnt End. Still other BBQ joints use the entire brisket, chop it all up and proclaim it to be Burnt Ends. Regardless of method there are some very delicious end results. Next time you are in Kansas City give Burnt Ends a try. You won't regret it.
(much of the info provided here on brisket and the process came directly from www.eater.com published by Bonjwing Lee)

Saturday, May 14, 2016
Low Country Crab Cakes
We spent the first eight years of my retirement in the beautiful South Carolina low-country, living on a little island called Callawassie. It is located between Hilton Head and Beaufort. The fresh seafood in the area is delightful and while living there I took a seafood cooking class from the chef of one of the Hilton Head country clubs. It was run through the adult education program of a junior college. We learned to cook a lot of the local seafood including, shrimp, oysters and crab. While most of us don't have our own crab trap or a dock to hang it off of, we can all get blue crab in our local grocery store. Costco probably has the best priced crab around and it comes in one pound cans. This recipe calls for two ponds of crab meat, but you can easily half the recipe. If you had to "pick" the meat from crab that you caught, it would take a whole bunch of crabs to make two pounds. When crab is caught commercially it is either sold live or cooked right on the boat that caught it. Then it is sold either in the shell frozen or the meat is picked from the shell and canned. That is the most common way to buy crab meat. So get yourself a couple of pounds of crab and make up a batch of these low-country crab-cakes. Enjoy them with a green salad and an oaky Chardonnay.
Ingredients :
Two pounds of canned crab meat
1/4 of a red onion- chopped
1 stalk of celery - chopped
One red bell pepper- chopped and then with the moisture squeezed from the chopped pepper
2-3 tsp Old Bay Seasoning
Three large eggs
3/4 cup Mayonnaise
2 TBSP whole grain mustard
1 1/2 cups bread crumbs
Preparation:
Open Crab and Drain any excess moisture. Chop Onion, celery and Red pepper. Wrap chopped pepper in a piece of cheese cloth and squeeze all of the moisture you can out of the chopped pepper.
In a large bowl, combine crab meat with onion, pepper and celery. Mix thoroughly. Season the mixture with two to three teaspoons Old Bay seasoning and mix well. Crack the eggs into the mixture. Add the Mayonnaise and mustard and fold ingredients all together with you hands. Begin to add bread crumbs a little at a time and mix in. Keep adding crumbs until you can roll the cakes into shape. They should still be sticky and not too dry. This recipe makes about 40 small appetizer sized crab cakes or about eight cakes the size of a hamburger if you want to use them for sandwiches or as an entree. Saute the crab cakes on relatively high heat. I like to use a combination of butter and olive oil to saute. You can hold in a 200 degree oven for some time before serving.
A simple sauce for the crab cakes can be made with one cup Mayonnaise, 1 TBSP Dijon Mustard, 1 TBSP Horseradish , 1/4 cup chopped capers and some ground red pepper to taste.
Friday, May 13, 2016
Seafood Kebabs
A high school classmate said she likes to have recipes that don't take longer than 30 minutes to prepare, so here you go Marsha. This is a quick and easy dish to prepare, and only takes about eight minutes to cook on the grill. You have to plan ahead a little, because you need to marinate the seafood for three hours or so, but the prep time is minimal.
Ingredients :
11/2 Lbs. Sea Scallops (16/lb. size)
11/2 Lbs. Shrimp (20/lb. size)
4 Small Cloves Garlic - finely chopped
1 cup Peanut Oil
1/2 cup Soy Sauce
2 Tbsp. Lemon Juice
1/2 cup Chili Sauce
Suggested Garnishes (Do not marinate)
Cherry Tomatoes
Red and Green Pepper Slices
Preparation:
Place Scallops and Shrimp in a glass or metal dish. Mix all remaining ingredients together and pour over the seafood. Turn the seafood occasionally, and let sit in the marinade for about three hours in the fridge.
Thread seafood on skewers, alternating with a few of the garnishes. I like to use two parallel skewers per kebab, to keep the seafood from spinning on the skewers. Thread the scallops so that the flat sides will lay on the grill. Broil about 4 minutes per side on a medium hot grill. Do not overcook ! The most common mistake with seafood is overcooking. Serve on top of a bed of saffron rice or noodle -rice casserole.
Thursday, May 12, 2016
Pan Seared Halibut On a bed of Green Vegetables with Burre Blanc
Right now you should be able to find fresh local asparagus, leeks and baby spinach at your Farmer's market. They are spring vegetables and add to the bright green color of this dish. You could substitute or add sugar snap peas as well. Burre Blanc is a classic French sauce, that is not low on calories but is high on flavor. Go about making it patiently and if you aren't successful on the first try, try again.
Pan Seared Halibut on a bed of Green Vegetables with
Burre Blanc Sauce
Ingredients:
Vegetables
1 lb Asparagus cut into 1
inch pieces
1 jar artichoke hearts cut
into spears
2 16 Oz. packages fresh baby spinach
3 Leeks – white portion
finely diced
2 TBS olive oil/butter
combined
Fish
4 Nice Portions Fresh Halibut
(roughly 6 OZ each)
Burre Blanc
1/2 cup white wine vinegar
1 cup dry white wine
1 TBS finely diced shallot
1 lb butter
2 tsp chopped tarragon
1 tsp chopped parsley
Preparation:
Begin with Burre Blanc preparation. In a saucepan bring vinegar, wine and shallot
to a boil. Reduce heat and let simmer
until mixture is reduced to two TBSP.
While liquid is reducing cut butter into ½ inch pats and return to
Fridge. Once liquid is reduced, reduce
heat to low and begin to add the butter to the liquid two to three pats at a
time. Whisk as you add the butter. Continue to add butter a couple of pats at a
time until you only have two to three pats left. Remove sauce from heat and add the last of
the butter. Whisk in. The sauce should be smooth and a little
frothy. Add herbs and season to taste
with fresh ground pepper and kosher salt.
Keep warm over very low heat. Do
not let the sauce simmer. You may have
to turn heat on and off just to keep the sauce warm.
Parboil asparagus for 2
minutes and drain. In a large skillet,
sauté leeks in oil/butter combination until transparent. Combine asparagus, artichoke hearts, and
spinach with leeks. Sauté over low heat until spinach is wilted. Reduce heat to very low and just keep
warm.
Salt and pepper fish on both
sides. Pan sear with very little oil and high heat until brown and cooked
thru.
Put a serving of vegetable in
the bottom of a pasta or large soup plate.
Ladle Burre Blanc generously over vegetables and stack fish fillet on
the top. Enjoy with a glass of crisp white wine.
Caponata
Caponata is a Sicilian dish, consisting of principally eggplant, peppers, tomatoes,and herbs It is traditionally served as an appetizer or anti pasta. I like it with some crusty Italian bread. This recipe comes from an Italian cooking class that I took in Norwalk Connecticut many years ago.
Ingredients:
Extra Virgin Olive Oil
2 small onions - sliced
2 Cloves garlic - sliced
One pound Italian eggplant - skin removed and cut into 1/2 in cubes
Four red peppers - sliced into thin strips
Salt/ Pepper
Four or five plum tomatoes - peeled and sliced
Two teaspoons capers - drained
12 Italian black olives - pitted and coarsely chopped
Four fillets of anchovies - chopped
Dried oregano
Preparation:
In a large sauce pan heat about 2 TBSP of the olive oil. Add onions and garlic and saute over low heat until translucent. Add eggplant and peppers. Season with salt and pepper and cook over a medium flame for about twenty minutes. Add tomatoes and a generous amount of dried oregano. Cook till eggplant and peppers are done. Add olives, capers and anchovies and remove from the flame. Let sit at room temperature for two hours before serving. Will keep in the fridge for a week or so, but always let it warm up before serving.
Wednesday, May 11, 2016
Tomato Salad with French Fried Shallots
Summer is coming and our Farmer's Market has been open for a month already. It won't be long until we have fresh homegrown tomatoes available. That got me thinking about this recipe that I created after having something similar at a local restaurant.
Tomato Salad with French Fried
Shallots
Ingredients:
4-6 Large Slicing
Tomatoes – red and yellow if available
1 Bunch of Fresh
Thyme
1- Large Log
Goat Cheese (Costco Size)
Jane’s Crazy
Mixed-Up Salt (Available at most Supermarkets)
½ Cup White
Balsamic Vinegar
1 Cup Extra
Virgin Olive Oil
Preparation:
Slice
Tomatoes. Arrange on a platter, overlap
slices and alternate slices of red and yellow tomato. Sprinkle with the Janes Crazy Mixed-Up
Salt. Cut goat cheese into ¼” thick
discs. Lay a goat cheese disc on the
center of each tomato slice. Wisk the
white balsamic and extra virgin olive oil together until emulsified. Drizzle the dressing over the tomatoes and
goat cheese. You won’t need all of the dressing. Just use as much as you think will work for your
taste. Save the rest for a salad later. Strip leaves off of the Thyme stems, until you
have about 1 TBSP of Thyme leaves.
Sprinkle the Thyme leaves over the tomatoes. Finally, top with the French Fried Shallots.
(See Recipe Below) Alternately, if you
are in a hurry, just use French’s Fried Onions out of the can. They work fine
but aren’t quite as spectacular as the French Fried Shallots.
French Fried Shallots
Ingredients:
2 – 3 shallots
1 Cup all-
purpose flour
1 tsp salt
¼ tsp black
pepper
2 eggs
1 TBSP
butter
¾ cup beer
4 cups
vegetable oil
Preparation:
Separate the
eggs whites from the yolks and reserve both the whites and the yolks. Slice
shallots into thin slices and separate each slice into rings. Whisk together, in a medium bowl, the flour,
salt and pepper. In another bowl, whisk
together the 2 egg yolks and the butter. Once they are blended, whisk the beer
in with the egg and butter mixture. Pour
the wet ingredients over the dry and whisk until just smooth. Let stand up to two hours at room
temperature. Beat the egg whites until
stiff but not dry. Fold the egg whites
gently but thoroughly into the batter. Place the vegetable oil into a pot until
it is about three inches deep. Heat oil
to 375 degrees. Drop 3-4 shallot rings
into the batter at a time and turn gently to coat well. Using tongs, lift the coated shallots out of
the batter and drop into the hot oil.
Fry until golden brown, about three to five minutes, turning once or
twice. Remove and drain on paper towel. Repeat until all of the shallot rings are
fried. Then use as directed above.
Seared Sesame Tuna
One fun thing about food is that whenever I look at a recipe in my collection, it immediately brings back memories about where I was when I got the recipe, who we were with and why did I enjoy it so much. What prompted me to ask for the recipe or at least tried to copy the dish when I got home ?
In the case of this seared sesame tuna recipe, my wife and I were in Savannah celebrating our anniversary. Our kids had given us a weekend at a wonderful new hotel there called Mansion on Forsyth Park. Our gift package also included a cooking class for me and a spa visit for my wife. The cooking school was called 700 Kitchen and the instructor was Chef Darin Sehner. He prepared this tuna, sliced it thinly and served it on a cucumber slice with wasabi mayo, as an appetizer. I liked the tuna so much that I decided to alter the recipe to larger portions and served it as a main course, although I still do the appetizer version as well.
Ingredients:(serves 4)
2 10-12 Oz. Fresh Ahi Tuna steaks approximately 1" thick
1 cup soy sauce
1 TBSP minced garlic
White sesame seeds
Black sesame seeds
1/4 cup sesame oil
2 TBSP canola oil
Preparation:
Cut each tuna steak into strips that are roughly an inch across, so that you have "logs" of tuna that are about 1"x1" and the full length of each steak. You should get 3-4 "logs" out of each steak. Place the tuna in a self sealing plastic bag with the soy sauce and the minced garlic. Press air out of bag, seal and refrigerate for thirty minutes.
Combine sesame seeds in a small plate and mix together. Remove tuna from marinade and pat dry. Brush all sides of the tuna "logs" with sesame oil and place one piece at a time in the dish of sesame seeds. Turn tuna until it is coated on all sides with the mixed sesame seeds. Set aside and repeat with each piece of tuna.
Heat a sauté pan until hot. Add the canola oil to the pan. When oil is hot, sear the tuna on all sides, just until outer layer is seared and colored. This will only take 30 seconds to a minute on each side. Do not overcook. This dish should be served rare.
I like to serve with rice or mashed potatoes and a mixed green salad.
If you wish to serve as an appetizer, allow tuna to cool. Slice tuna into thin slices across the grain. Top a cucumber slice with wasabi mayo. ( You can buy it in most supermarkets, or make your own by stirring a little wasabi paste into mayo, and adding a touch of lime zest. ) Lay a slice of tuna on top of the mayo/cucumber slice.
You can use this same method to prepare salmon and make a wonderful appetizer tray with a mixture of the cucumber planks topped with both salmon and tuna.
Asian Flavored Rack of Lamb
Having grown up in the Midwest, I never ate much lamb, but when we moved to Australia for work, we had to learn to cook and eat lamb. The lamb in Australia and New Zealand is superb. This is a recipe that I brought home from Australia. The original version called for using a butterflied leg of lamb and roasting the meat in the oven. Since there are just two of us in our household, I have modified the recipe and use rack of lamb. One frenched rack will serve two to three people. I generally allow for three ribs per person. I do the cooking on the grill which gives the marinade a nice crispy bite and is much quicker than roasting. If you prefer doing a leg of lamb, marinate the meat for 24 hours and roast in a 450 degree oven on a rack in a pan with a little water on the bottom of the pan.
Ingredients:
One rack of lamb (preferably from New Zealand) (for a larger group allow 2-3 chops per person and buy the # of racks needed)
Marinade: (adjust quantities upward for greater quantities of lamb)
4 cloves garlic crushed
1 TBSP sugar
1 TBSP chopped fresh ginger
2 TBSP Ketchup
2 TBSP soy sauce
2 TBSP dry sherry
3 TBSP Hoi Sin Sauce*
1 TBSP honey
1 Tsp. Chinese five spice powder*
*available in the Asian section of your supermarket
Preparation:
Combine all Marinade ingredients in a small bowl and stir well.
Remove lamb from packaging and wash and pat dry. Trim some of the extra fat off of the back side of the rack. Using a sharp boning knife, separate the rack into serving size portions of two to three chops each.
Put chops into a non-reactive baking dish and cover with the marinade. Cover dish and refrigerate. Allow the meat to stand in the marinade for 3- 4 hours.
Pre-heat grill, with direct flame on half and indirect heat on remaining part of grill. Sear chops on each side over direct heat, then move them off of the direct heat and cook for a few minutes on each side. I like to serve the chops rare, but you may cook as you like.
I like to serve the lamb on a bed of Garlic mashed potatoes with some nice fresh asparagus on the side. And of course, you will need a glass of Australian Shiraz to accompany the lamb. Penfold's Ste. Henri, will do nicely.
Tuesday, May 10, 2016
Equipment
If you want to take cooking seriously, you have to take your equipment seriously too. Over the years, I have used several brands of knives but have settled in on two preferred brands. I have a full set of Zwilling J.A. Henckels Professional 'S' knives. They are made in Solingen German and are crafted from one solid steel blank from the tip of the blade to the end of the handle. The handles are made from ABS resin and are contoured to fit nicely in your hand. They are triple riveted to the blades. The stainless steel blades are ice hardened and with proper care will last for a lifetime. Depending on where you purchase them, a full set of these cooking knives will cost somewhere between $500 to $1000. I know that is a big investment, but any chef will tell you one of their most important tools is their knives. If you don't want to spend the money initially for a full set, I would recommend starting out with a 4" paring knife and an 8 or 10" chef's knife. You will also need a honing steel. If you start out with one or two knives your initial cost will be lower, but if you eventually get an entire range of knives they will cost you more than buying them in a set . Although I don't own any, I have also used and would recommend Wusthof Classic knives. As with any commercial item, be sure to note the line of knife you are purchasing. Just like most manufacturers, both Wusthof and Henckels have different lines, ranging from relatively inexpensive to the higher end lines I have mentioned. Stick with the better lines. (No pun intended)
Proper care of your knives is very important. My knives are 15 years old and are still as good as they were the day I bought them. Never put good quality knives in a dishwasher. Wash them by hand in warm soapy water and dry them immediately. Before each use run each side of your knife's edge over the honing steel 4-5 times. This will align the edge of the blade and keep your knife sharp. Don't cut directly on hard surfaces like granite or steel. Once or twice a year, more if you use them a lot, you will need to have your knives professionally sharpened. In the Kansas City area where I live, Ambrosi Brothers at 31st and Main are excellent sharpeners. They charge about $4.00 per knife. Most cities and towns will have professional sharpeners.The sharper your knife the safer it is, once you have learned proper knife techniques.
If you google "using a chef's knife" you will find several good videos on proper knife techniques. Watch one and practice. It will be worth your time in the long run.
Welcome
Welcome to my Blog, Grandpa Cooks. I am retired and have spent the last 17 years traveling and studying food and wine around the world. I have collected recipes and tips and would like to share some of them with you, so lets get started.
Here is a simple recipe for Baked Ziti, a hearty dish that combines classic Bolognese Sauce with the three classic Italian cheeses, Ricotta, Parmigianino and Mozzarella.
Ingredients:
1 # Ziti
1 # Sweet Italian Sausage
1/2 # Ground Beef
One 28 oz. can Crushed tomatoes
2 Cups Ricotta
One cup fresh Mozzarella (cut into 1/4 " cubes)
1/2 Cup Grated Parmigianino
One large onion - finely chopped
One Carrot - finely grated
Two Bay Leaves
Salt and Pepper
Preparation:
Preheat oven to 350 degrees
Bolognese;
Using a large heavy bottomed stock pot, Sauté the onion and carrot in 1 TBSP olive oil, until the onion is tender and translucent. Add the Crushed Tomatoes and Bay Leaves and simmer over low heat for about an hour.
Stir occasionally to make sure the sauce is not sticking to the pot. While the sauce is simmering, cook the Italian sausage and brown the ground beef. Drain the beef and season with salt and pepper to taste. Slice the cooked Italian sausage into very thin slices. Add both the sliced sausage and ground beef to the sauce in the stock pot and simmer on low for another half hour. Remove the Bay Leaves and discard.
Cook the pasta Al Dente according to the package directions, and drain. Add the pasta to the sauce and mix together thoroughly. Stir the Ricotta into the pasta and sauce mixture, again mixing thoroughly. Transfer the mixture into a 9 x 13 " glass baking dish. Top evenly with the grated Parmigianino and then with the fresh mozzarella cubes. Bake in the 350 degree oven until the Mozzarella is melting and begins to brown. Let set for a few minutes before serving.
Enjoy this dish with a Caesar Salad, some crusty bread and a glass of nice red wine. This is truly "Comfort Food". The recipe comes from Mario Carrate. Mario was a food broker in New York city and catered to the shops on Arthur Avenue in the Bronx. His father had run an Italian restaurant on Arthur Avenue for years.
Subscribe to:
Comments (Atom)